Your first line of CSS
HTML gives structure to your page, but CSS is what makes it beautiful. It controls colors, layouts, fonts, and everything visual.
Let's write your first CSS and understand why it's such an essential part of web development.
🎨 What is CSS?
CSS stands for Cascading Style Sheets. While HTML defines the structure and content of a webpage, CSS controls how it looks.
Think of it this way: HTML is the skeleton, CSS is the skin, clothes, and makeup. Without CSS, every website would look like a plain document from the 90s.
Here's a simple example of CSS in action. The HTML defines the structure, and the CSS file makes it look polished:
<!DOCTYPE html>
<html>
  <head>
    <link rel="stylesheet" href="styles.css">
  </head>
  <body>
    <h1>Welcome!</h1>
    <p>This is a paragraph.</p>
    <button>Click me</button>
  </body>
</html>
MDN is your best friend. The Mozilla Developer Network (MDN) is the definitive reference for CSS. Whenever you're unsure about a property, search "MDN" + the property name.
📈 The CSS learning curve
Here's something nobody tells beginners: CSS has a deceptive learning curve.
At first, it feels easy. You change a color, adjust a font size, add some padding — instant gratification! Then you try to center a div vertically, or make a responsive layout, or fix that mysterious gap that appeared out of nowhere...
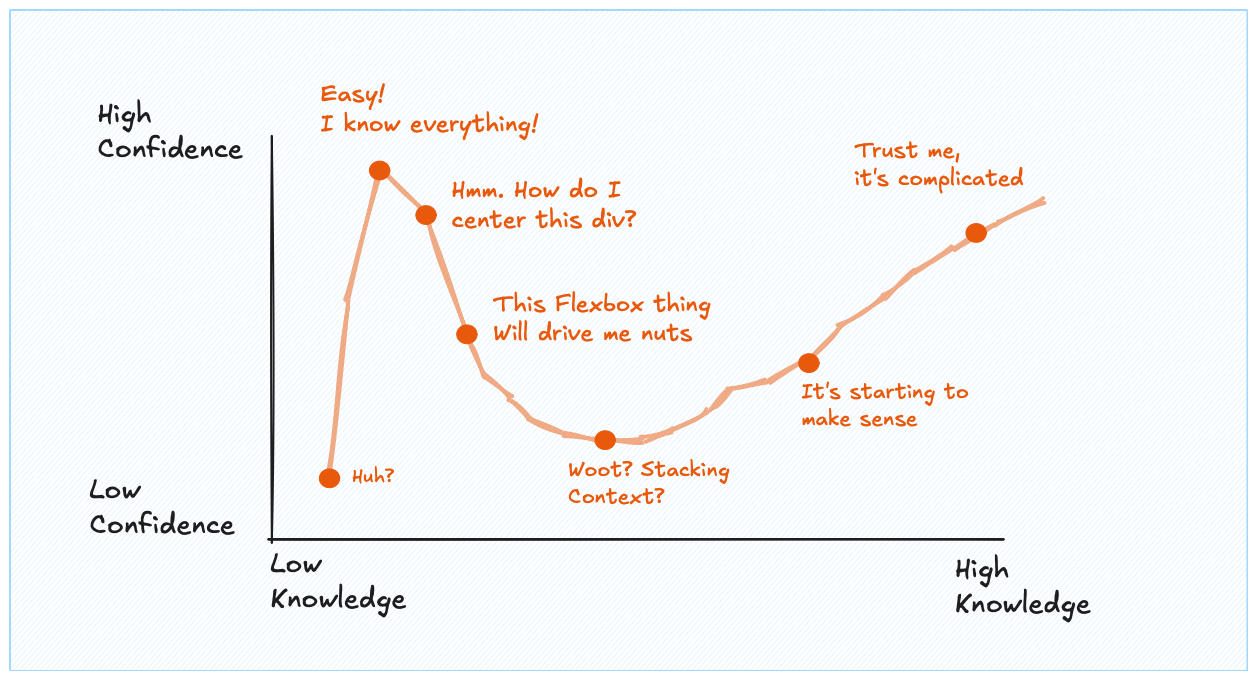
The Dunning-Kruger effect in action. CSS humbles everyone eventually.
Don't worry — we'll build a solid foundation. And remember: in the age of AI, you don't need to memorize everything. You need to understand the concepts so you can guide AI to write the CSS you want.
🔗 3 ways to add CSS
There are three ways to apply styles to HTML. Each has its place, but one is clearly the best for real projects.
The recommended approach. Create a separate .css file and link it in your HTML's <head>. This keeps your styles organized and reusable across multiple pages.
<!DOCTYPE html>
<html>
  <head>
    <!-- Link to external CSS file -->
    <link rel="stylesheet" href="styles.css">
  </head>
  <body>
    <h1>External CSS</h1>
    <p>Styles are in a separate file.</p>
  </body>
</html>
- + Styles in one place, easy to maintain
- + Can reuse across multiple HTML files
- + Browser can cache the CSS file
🔬 Anatomy of CSS syntax
CSS is a collection of rules. Each rule tells the browser: "find these elements, and apply these styles to them."
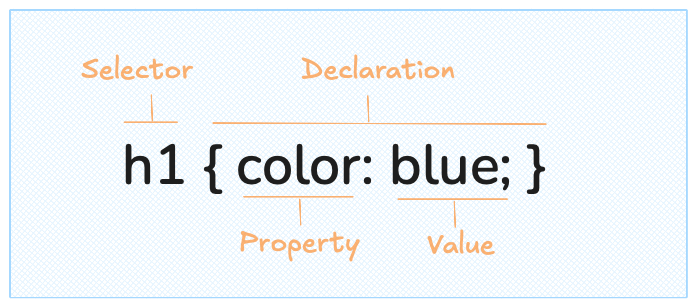
A CSS rule: selector targets elements, properties define what to change, values define how.
Let's break it down:
- Selector — Which elements to style (e.g.,
p,.button,#header) - Property — What aspect to change (e.g.,
color,font-size,margin) - Value — The new setting (e.g.,
blue,16px,20px)
You can have multiple properties in one rule, each ending with a semicolon:
<!DOCTYPE html>
<html>
  <head>
    <link rel="stylesheet" href="styles.css">
  </head>
  <body>
    <p class="fancy">
      This paragraph has multiple styles applied.
    </p>
  </body>
</html>
🎯 Types of selectors
Selectors are how you tell CSS which elements to style. Here are the three most common types you'll use daily.
Element selectors target all elements of a specific type. Write the tag name directly.
<!DOCTYPE html>
<html>
  <head>
    <link rel="stylesheet" href="styles.css">
  </head>
  <body>
    <p>First paragraph - styled</p>
    <p>Second paragraph - also styled</p>
    <span>This span is NOT styled</span>
  </body>
</html>
This styles every <p> on the page. Use when you want consistent styling for all elements of a type.
🧰 The most common properties
CSS has hundreds of properties. The full list is on MDN's CSS Reference. But don't panic — you'll use the same 20-30 properties for 90% of your work.
Here are the essentials to get you started. Don't try to memorize them: just understand what's possible.
Text & fonts
<!DOCTYPE html>
<html>
  <head>
    <link rel="stylesheet" href="styles.css">
  </head>
  <body>
    <h1>Styled Heading</h1>
    <p class="intro">This text demonstrates common text properties.</p>
    <p class="small">Smaller, lighter text.</p>
  </body>
</html>
Colors & backgrounds
<!DOCTYPE html>
<html>
  <head>
    <link rel="stylesheet" href="styles.css">
  </head>
  <body>
    <div class="card">
      <h2>Colors in CSS</h2>
      <p>You can use names, hex, rgb, or hsl.</p>
    </div>
  </body>
</html>
Spacing: margin & padding
This is where CSS gets tricky for beginners. Every element is a box. And the space this box takes is an addition of:
- Padding — Space inside the box (between content and border)
- Border — thickness of the line around the box
- Margin — Space outside the box (between this element and others)
16px2px20px.box { background-color: #dbeafe; border: 2px solid #3b82f6; padding: 20px; margin: 16px; border-radius: 4px; font-size: 14px; color: #1e40af; }
Drag the sliders to see how margin, border, and padding affect the layout. The code updates in real time!
🚀 Just the beginning
CSS is deep. After 12+ years of building websites, it's still the code that makes me struggle the most. If someone tells you CSS is easy, they just haven't tried to build anything complex yet.
But here's the good news: you now have the foundation. You understand selectors, properties, the box model, and how to link CSS to HTML. That's enough to start styling real pages.
We'll learn more CSS concepts as we need them throughout the course. For instance, flexbox for layouts, and the position arguments will come soon as they're so important.
For now, let's move on and start building something real.
Oh no! 😱
It seems like you haven't enrolled in the course yet!
This is a lesson from the D3 ❤️ React course, where you learn to create bespoke, interactive graphs with d3.js and React.
Enrollment is currently closed. Join the waitlist to be notified when doors reopen:
Or Login